- Technical Design -
Researching into Stills Cameras...
Before using a DSLR, we thought it would be good to research SLRs.
Single-lens reflex (SLR) cameras use a mirror to reflect light gathered from the lens onto film to create a true image of whatever it is pointed at. In viewfinder cameras, the desired image can be distorted by parallax, but SLRs contain a prism system that corrects this. SLRs have various interchangeable lenses for different situations; for example zoom lenses to bring distant objects closer, wide-angle lenses to capture more of a compact location, or macro lenses for extremely close-up detail.
| 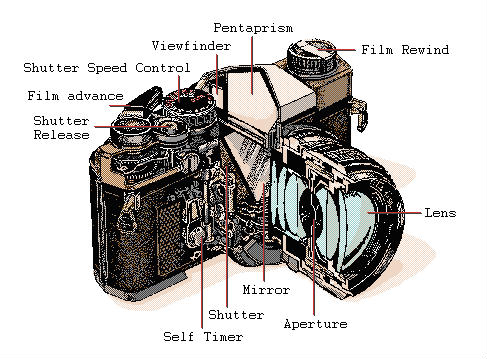 An example of an SLR camera (Source) |
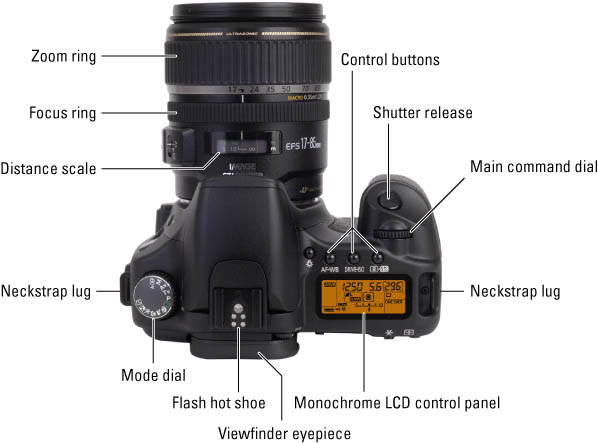 A typical DSLR camera (Source) | A DSLR works in much the same way, but rather than recording the image on film, a digital sensor collects the light data and interprets it as a complete image. DSLRs not only use a variety of lenses like SLRs, but may also feature different shooting modes to allow for further control over the resulting photographs. These preset modes can be selected using the mode dial, and are described below: Auto Mode - Every aspect of shooting is automatically selected. Program Mode - Shutter speed and aperture setting are selected automatically. Other settings can be manually adjusted. Shutter Priority Mode - Aperture setting is automatically set depending on the chosen shutter speed. Aperture Priority Mode - Shutter speed is automatically set depending on the aperture setting chosen. Manual Mode - All settings, including shutter and aperture are manually selected by the user. |
Important things to consider...
Aperture Stop: The camera's APERTURE is the hole through which light enters. This hole can be widened and narrowed by moving interlocking metal plates known as a diaphragm; effectively STOPPING the APERTURE. This aperture size is often referred to as an 'f-number.' The higher the f-number, the smaller the aperture. Controlling the aperture affects the depth of field that will be in focus when the shutter is closed. The higher the f number, the larger the depth of field. Shutter Speed: This is the length of time the camera's shutter is allowed to be open. This affects how movement is displayed, as a fast shutter speed stops action in an instant; a slow one can result in motion blur and light trails. | 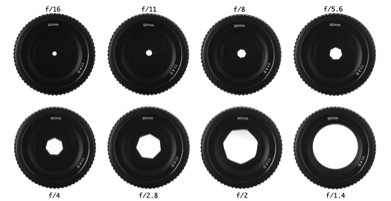 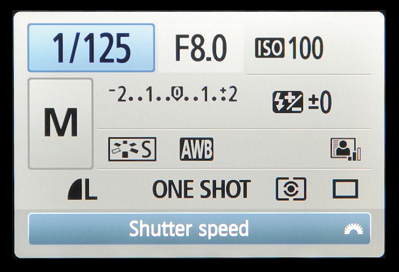 |
- Graeme Blake
ISO: What is ISO?
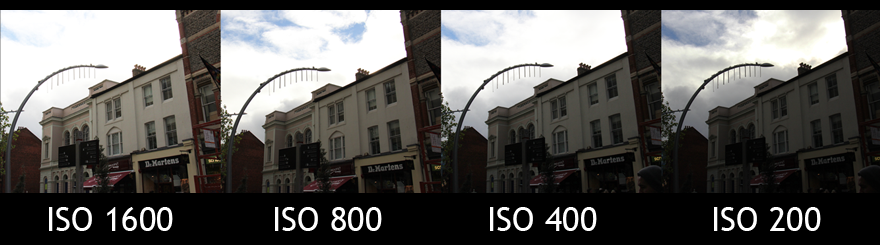
The ISO speed affects the shutter speed and aperture settings you can use to create the correct exposure in your photo. So for example, if there isn’t enough light to allow you to correctly expose the scene, you could use your on-board flash, but that would run the risk of very bright and bleached areas in the photo. | 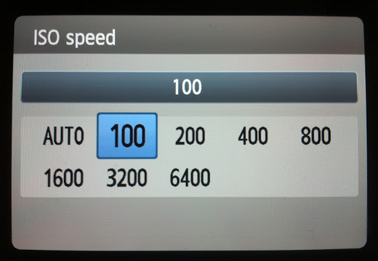 This is just one example of the different ISOs you can get on a Canon EOS. A better EOS camera will have more options to choose from. |
Instead of using your flash, you would need to use a higher ISO, or just rely on the ISO Auto setting on your camera. The only problems with using higher ISO settings is that you also start to get a lot of noise in your image, which creates an undesirable grain to your photo from where both the extra light and the sensor itself is adding colourful dots to your image.
You could experiment with different shutter speeds, to see if a slower one would help with the exposure, but again there’s a risk of a blurry picture if you’re taking the photo without a very good tripod.
The better the light where you’re taking the images, the lower the ISO and therefore the better image quality you will get.
For our own work, the ISO is something we really need to focus on as we plan to make a documentary which will mostly take place outside so there will be varying forms of natural light to work around when filming.
- Jessica Hallett
Researching into the cameras that we will be using...
Canon 60D We have chosen to use the Canon 60D as one of our main cameras in this project. Not only is it a fantastic camera for taking stills with, it also allows full HD video capture and has a handy flip out monitor screen which twists in different directions, so no matter where the camera is held, you can always see the screen. Coupled with the right lens, the HD footage obtainable with a 60D far surpasses most EOS cameras in it's range. We want to be able to capture the very best images and video footage during our project, so this camera is ideal for that purpose. | 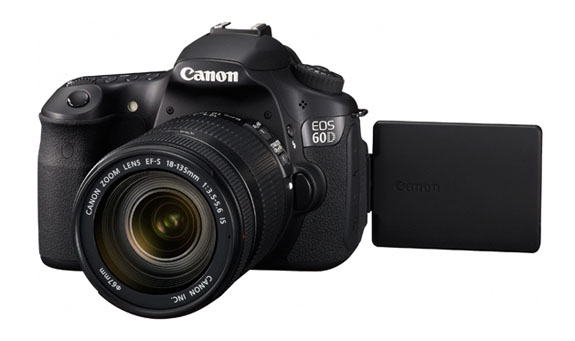 |
Canon 650D Like the Canon 60D, the Canon EOS 650D has a host of features. It is brilliant for any rookie beginning their journey into becoming a photographer. This is especially ideal for the weaker photographers in our group who want to be able to learn more and become more confident with a camera. The 650D is certainly user friendly with less buttons and a new touch screen feature available so looking through the photos you take are easy in addition to having a flip screen so that everyone can be in the photo perfectly. It shoots faster and has double the ISO setting from the previous 550D. The Canon EOS 650D is a handy tool for any semi-professional photographer. We chose to use this camera for some of our documentary footage mainly because we were given proper training on it and we love the style of shot you can get with a DSLR camera and lens. The 650Ds will act as back ups to our main cameras whilst shooting. | 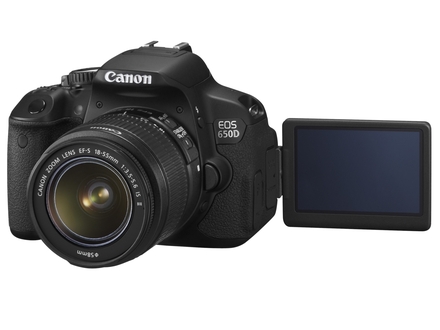 |
- Toby Weller
Using Artificial Lighting...
When taking the use of artificial lighting into question, the lighting technician must first read the script of the film several times to achieve an appropriate lighting plan. The director and the lighting technician should both be clear about what the lighting plan is, to avoid any conflicts or misunderstandings on set. We will be keeping this in mind when filming our project, keeping the director in particular aware of any plans the lighting technicians have for the scenes being filmed.
Regarding the practical aspects of the use of artifical light, we will have to take into account any available light if there is any. When possible, we will use the available light in the most efficient way we can, adding additional lighting when necessary. For each scene, we will set up the camera to see what exactly needs to be lit during the shot, this way we will avoid wasting time lighting areas that will not be shown in shot.
Once we have understood how potent the natural/available light is, we will be able to build our three point lighting system around it. We will take photographs of the set to get a clearer idea of what will be seen on film, and how much lighting needs to be added (if any). We will keep in mind that what appears on film often appears different to what appears to the human eye on set, and this we will use lighting to gain the visual we want for the film.
Three Point Lighting
Three point lighting is a technique used in various forms of media. Used in film, photography and even CGI imagery, this technique has become a standard practice in many sections of media production. The name "three point lighting" comes from the fact that while using this technique, the media maker will place three separate lights in three separate positions, in relation to the character being filmed or photographed. This means that the character on screen can be illuminated, however desired. It also means that the shadows within the shot can be controlled by placing the lights in the appropriate direction. 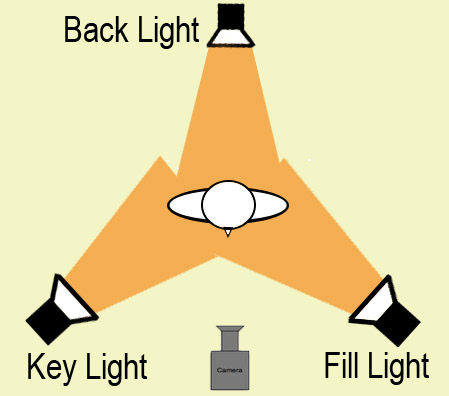 Picture Source |  Picture Source Out of the three lights used in this technique, the key light is usually the most important light that a cinematographer will use during this lighting set up. There are different ways to optimize the use of a key light, but while using three point lighting, it is positioned at a 30–60° angle, the beam directly reaching the character being filmed, and acts as the main source of light for the shot. The key light dictates the lighting design, which we will keep in mind during filming, as we will need to take into account the strength, angle and colour of this light as it effects the entire aesthetic of the shot. We will need to take into account several factors when setting up a key light. The location of a set is crucial to the set up of key lighting. When filming outdoors, should the weather conditions be bright and clear, artificial light is therefore unnecessary, and the sun itself can serve as a key light for the film. |
A disadvantage of this is that the scene composer cannot adjust position of the main source of light, and we will be weary of this - we do not want to be waiting outdoors for the sun to position itself in a suitable place for us to film under it.
The fill light in the three point lighting system, is used for the purpose of decreasing the contrast of the scene, and to decrease the strength of the shadows within the frame. The fill light is usually softer than the key light, but the ratio between light and shadow depends on the intent the film maker has for the scene.
It is placed at a side angle to the key light, often below it, at the level of the subject's face - this will be crucial to master for our documentary, particularly as we will be interviewing our subjects, a convention of most documentary films.
Placing the fill light here allows for more balanced light distribution, as it illuminates surfaces that are covered by shadow, lessening distracting chiaroscuro effects, such as the shadows cast by the nose on a character's face.
We will take into consideration that if we neglect to use a fill light, our project could have shots full of harsh contrasts: Considering we are making a documentary, we will want a more natural look for our scene, to encourage the viewers not to perceive the scene to have a film-set quality about it, and to accept the film as "truth." The use of fill lighting can subtly make a documentary appear less staged and more investigative.
However, we also understand that we can also use a reflector should the use of lamps become too potent in the scene. If there is too much light involved in a scene, a reflector can act as the fill light instead of an actual lamp. This has an added benefit of more subtly which will make our documentary appear more natural, more "real" and less set up. We will need to explore and become practiced at using both options in order to gain the best possible fill light for our documentary scenes.
The last light included in three point lighting, is the back light. This is placed behind the character in the scene, giving the subject an outline of light, separating the character from the background of the scene. This is important as we can use this while filming our documentary to encourage the audience to focus on the character in question, as this subtle lighting technique makes the character physically stand out more to the audience.
According to Gerald Millerson, an expert in studio production:
“The scene must be illuminated to show exactly what is wanted, but the audience should not be aware of the lighting.”
I believe that we will achieve Millerson's standard in filming our documentary, should we become practiced at using the three point lighting system. The system, when used correctly, is subtle - as Millerson described, and we can also encourage the viewer to focus on the desired characters of our film, provided that we use the three point lighting system to correctly illuminate the desired character.
- Louise Hart
Equipment...
Dedo Lighting
 | Dedo lights, like fresnel lamps, can be used in three point lighting. Dedo lights are a 3-set piece, these lights offer more control over how much light is needed to shine through to create the right effect. Making the right choice whilst filming will help to give the camera the best visuals to be able to capture. Dedo lights are especially useful as they are implemented with unique optics which allow the light to be focused so accurately that you can projectclear shadows onto the character in the scene. Dedo lights, because of their voltage, can often be used as camera lights, taking power directly from the camera battery. A good example of when they could be used would be for an interview in a 3-point setup. How we light the person will also help to identify how we see the person for example if there well light we see them as a good person who we can trust though if we add shadow under the subjects eyes we may perceive them as being untrustworthy. Not only this but if our documentary looks subtle, and less staged (which is achievable with a fill light in the three point lighting system) the viewer will be more likely to take it as fact. Practically, dedo lights are very compact and a complete 4 head kit with dimmers and stands fits into a small soft carry case - which will be useful during our documentary as we will be on the move a lot. |
Arri Lighting 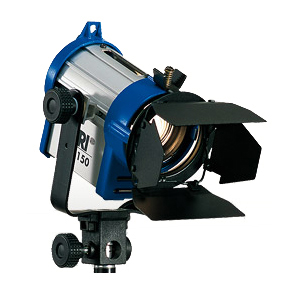 | Arri lighting is a popular tool for film makers world wide and the company that produces Arri lighting is the largest corporation responsible for professional motion picture equipment in the world. Arri lights are practical and versatile firstly because they have been constructed to be appropriate for use during filming with both HDV and DV cameras. Not only this but there are several variations of Arri lights, which offer different functions depending on the film-maker's needs. For example, Arri junior lights are Fresnel lights, which, because of a built in Fresnel lens with an optimized reflector, can create a strong spot light and have an even light spread. Barn doors with this species of lighting equipment, allow for calculated aim of the light, and are a good example of how continuous lighting can be used. With this equipment, the colour temperature will not be altered because of the light source due to scrims being available for use. |
Arri junior lights are ideal for our documentary, as they are typically used as key lights to light people specifically or to establish highlights. We will use this technique to direct our audience to what we want them to focus on in each individual shot, and also use this practice to avoid lighting an area that the audience has no interest in focusing on.
Arri lighting is progressing technologically, with the one of the latest editions to their merchandise offering 21% more light efficiency than it's previous model the ARRILITE 800W. The ARRIMAX optical system improves the division of light and the lights are easy to navigate around the film set using the one arm stirrup to pan and tilt as need be, a brake system implemented to securely lock the light once it has been positioned. This will be useful as there will be no accidents due to lose swinging lights on set, and we will will also not have to continuously adjust the lighting back to it's original spot for continuity. Also, a heat proof handle is installed on this device, meaning there will be no accidents regarding heat due to a crew member becoming burned due to a hot handle.
Regarding practicality as well as health and safety again, no tools are required to change the bulb of this lighting equipment, as the surrounding device to keep the bulb secure consists of two detachable parts that open and close through bayonet cap locks. Arri lights have progressed further technologically also because the newer merchandise comes with lighter aluminium housing, designed to improve the rate of heat dispersal. The lamp head is fitted snugly to be ideal for electronic news gathering, field production and fast turnaround location use in portable kits. For our documentary we will make use of this, as will be somewhat animated in following our subjects around to gain adequate footage of the "truth" of their lives.
Should we film on a day that is harsh in weather conditions Arri lighting offers adjustable colour temperature, with a choice of six colour temperature settings from from 2800K to 6500K, with continuous dimming. With all these features, Arri lighting kits only typically weight 2Ibs - ideal when mobile, which we will keep while filming our documentary.
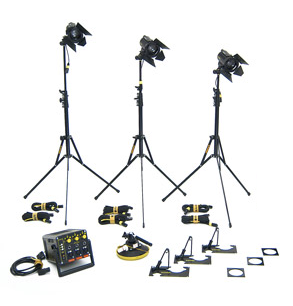
There are kinds of Arri lighting that are specifically designed for interviewing characters in a film, which is of course ideal for our documentary. The three head Arri interview kit has a range of features, including an ARRILITE 800w open faced flood light, two Junior Fresnel 650w spotlights and three lighting stands. This is ideal for three point lighting, a technique we intend to use in our documentary in order to illuminate a subject we want the audience to focus on. We also understand that we can further equipment to our set when making use of this lighting kit, in order to gain the best possible result when shooting our film.
Audio Equipment...
The Marantz PMD660 is a compact bodied, full-scale digital recorder. It is designed entirely for professionals and includes and XLR microphone input with phantom power and up to 20dB attenuation.
This Marantz has longer battery life, about 4 hours, so it allows us to record our sound without panicking about running out of time to do so!Highlights * Record directly to compact flash cards | 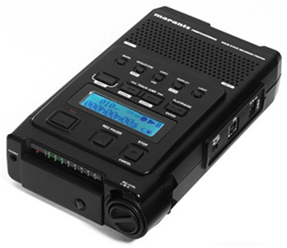 |
Microphones and Audio
Dynamic microphone (Used for Foley recording) Dynamic
microphones are one of the simplest and most rugged of microphone designs. The
pickup diaphragm is connected to a coil/magnet assembly - similarly to a
loudspeaker cone, but in reverse. |  Common uses: Microphones for live performance, or requiring the ability to handle high volumes and/or particular frequency bands. Advantages: Small, inexpensive, rugged and relatively moisture-resistant. Disadvantages: Uneven frequency response |
Shotgun microphone (Used for dialogue) A
condenser capsule will be positioned in a long slotted tube, which serves - by
means of a complex system of diffraction and phase cancellation - to tighten
the pickup pattern into a highly directional "beam". This particular
arrangement of microphone elements is referred to as a shotgun microphone. Shotguns are often mounted on a boom arm, in combination with a windshield for on-location recording. The length of the slotted tube is an indication of the degree of directionality - generally, the longer the tube, the tighter the pattern. |  Common uses: On-location interviews, field recording, film & television. Disadvantages: Tight pattern unsuitable for many applications. Comb filtering artefacts imparted by slotted tube mounting. |
Audio Connection...
Connection Almost all microphones will terminate in one of two connection types: XLR The most common connector for professional microphones is the XLR connector, which is available in both ‘plug' and ‘socket' (usually called ‘male' and ‘female') forms, and full-size and miniature sizes. Mini XLRs are usually only found on miniature radio mics or similar, and the full sized version (pictured) is the far more common of the two. | 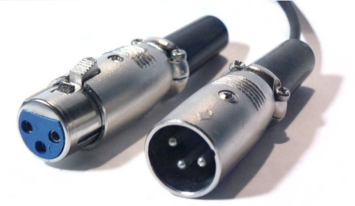 Female (left) and Male (right) XLR connectors. |
Three pins (and therefore three cable cores) are used to transmit two identical but phase-inverted signals with a common ground, which are then summed at the other end, after again flipping the phase of one side. This process serves to double signal strength and to phase-cancel any noise picked up in the cable run, and is called ‘signal balancing'. It enables much longer cable runs than a conventional two-core cable will allow, and lower noise.
XLR connectors are also used for delivering phantom power to condenser microphones, and are the professional standard for much high-end audio hardware. XLR cables (male to female) can also usefully and securely be chained together to cover larger distances.
In almost all cases, male connectors are used for signal output, and female connectors for signal input.
Jack plug Some microphones use the familiar ‘headphone' jack as their connector. Again this is available in full (1/4") and miniature (3.5mm) sizes - for reference, the headphone connector found on an iPod, for example, is a 3.5mm stereo mini-jack - and two and three core versions, often referred to as mono or stereo. The three-band version is also referred to as TRS (Tip - Ring - Sleeve). Close inspection of the bands around the tip of the plug will indicate which type it is [see image]. Many consumer microphones use jack plugs for connection, as this is the ‘mic' socket found on many domestic PC sound cards and handheld recorders. | 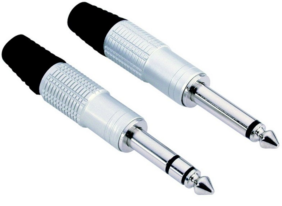 |
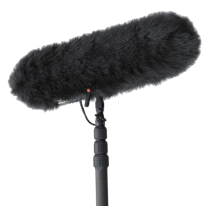
Boom Pole
|  |
- Alice Zhu
Extra Equipment...
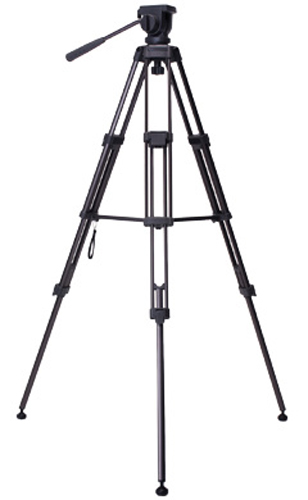
Tripods
A camera tripod can make a huge difference to a photo or filming. Using a good tripod will help to reduce the camera shake which would have resulted in blurred images. The sharpness and overall quality of photos will turn out so much better.
An example of a photo you shot you might be trying to get using a tripod could be a sunset on top of a mountain. Using a tripod will enables the photos to be taken with no camera shake, great focus and less light or a greater depth of field, in addition to enabling several specialty techniques. For our work, we are going to make sure that we choose a sturdy and weighted tripod, not a cheaply made one or thin legged one. The university allows us to loan out a Libec TH650DV Tripod - lightweight fluid head tripod with ball leveller, ideal for our cameras and great for use on all types of surface, including unlevel ground.
|  |
- Toby Weller
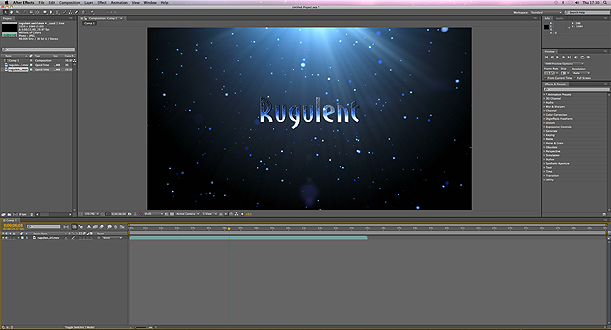
Adobe After Effects
 | Adobe After Effects is a digital visual effects software that allows the user to develop cinematic visual effects and motion graphics. Used in the process of post-production film making, its main functions are 2d animation, the making of visual effects and finishing such as colour correction. After Effects has a large base in motion graphics and animation. After effects can also be used to edit footage and act as a media transcoder. The programme contains several panels, including the Composition Panel, the Project Panel and the timeline Panel. |
The Composition Panel displays items at the current time marker. The Project Panel imports video, audio and stills. The items in the Project Panel are used in the Time Panel, where timing and layer order can be edited.
Traditionally, working with animation and effect has meant loading a project, then waiting a considerable amount of time as the work renders frames into a cache during it’s first run through, before allowing the user to preview the composition or a selected work area for the project. With After Effects it is possible to open and cache one project while simultaneously working on another composition using a new command in the composition menu, “Cache Work Area in Background.” This will prove useful to use when working towards a deadline as this is an efficient time saver.
 | If we need the project to run in real-time, After Effects used to require the user to load it into RAM using the RAM Preview facility. The first time it is run, a green line is displayed across the top of the timeline in the lower part of the window, showing which frames have been cached into the RAM. The green line usually disappears as the cached composition has now changed. But the next RAM preview is now running significantly faster than the first preview, despite the change/ If the effect is deleted the green line will reappear on the screen and the preview will once again runs in real-time without loading the RAM preview again. |
Adobe have restructured the system to recognise any frame of a layer inside a project that is the same as a previously rendered and cached frame. This means it does not need to be rendered, which will again, save us a lot of time and be useful to us when we are working to a deadline.
Another useful and fairly new feature of After Effects, is whereupon closing the project or programme down, upon reopening a previously rendered project, the programme can locate all the previously cached frames on the disk, without needing to re-render them. After Effects will once again, prove useful to us when we need the project to be done by a certain time. This also means that previously rendered frames can be found again, should we need them.
With the new version of Adobe After Effects, we can be more creative in making our project as the new version has 90 new and updated built-in features, which gives us more opportunity to add more effects to our project, and more ways to be creative when editing our footage.
- Louise Hart
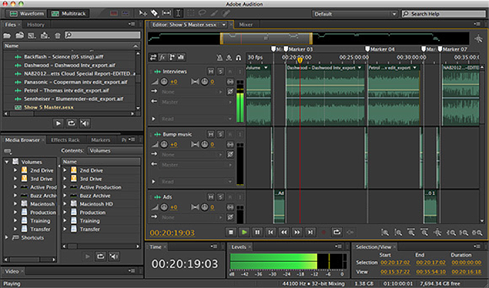
Why Audition?
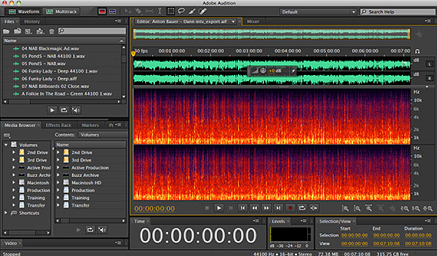
Editing sound using Adobe Audition has many advantages that could help our trailer to get a good quality of sound. As Adobe Audition is a power digital audio editing, repair and mixing application. Its feature function includes: multi-track, comprehensive set of effects, filters, tools and a destructive-way waveform view. Even though there are lots of functions, but they are all not complicated to manage.
The Key Audio Displays Multi-track session display is used for mixing and editing multiple clips.
|  |
Waveform Editor: is used to edit individual audio clips. Wave editor displays and edits a single audio
clip and allows accurate editing down to the individual audio sample. | 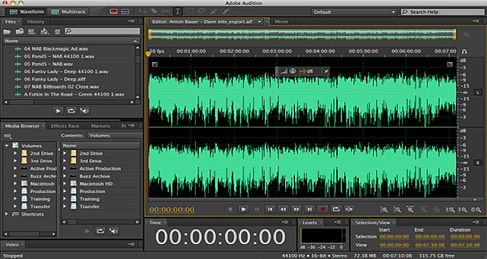 |
Audio Pitch is used for musical pitch display and shifting. | 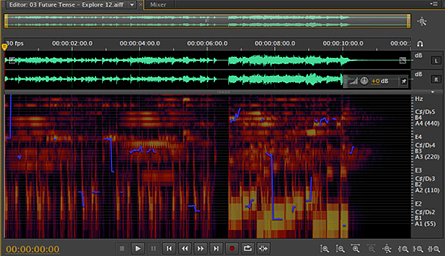 |
Frequency Spectrum: is used to select and remove specific frequencies. Frequency spectrum is a part of the wave editor, which allows to chose and edits sections of single clips based on frequency.
|  |
- Alice Zhu
RAW IMAGE FORMAT
A photograph taken using raw image format is composed of minimally processed data from the image sensor of the camera.
These images are called “raw” because they are not yet processed and therefore are not fit for editing or printing. They are also nicknamed “digital negatives” because they have the characteristics of negatives in traditional photography, i.e. the negative is not useable as an image by itself, but it can certainly be used to create an image. A raw photograph, although never the end result, it is certainly possible for the end result created with a RAW image to be better than that created with a JPEG.
Raw format is capable of handling vast amounts of transformations in the data of the image, such as decreasing the exposure of a very over-exposed photograph. The photographs are easier to manipulate and corrections are easier to make, without meaning that the image becomes posterized, We are all experienced in photoshop, and using the raw image format will make our manipulation of the images in photoshop much more efficient.
Because the raw format in cameras uses a variety of calculations such as white balance, brightness and contrast, gamma correction etc, this generates pixel values in a more efficient way, the pixels will be more accurate, the image will have more clarity and the photograph will have reduced noise and posterization. Therefore using raw image format, the image quality in the photographs will be higher. Raw image format also ensures that as well as opportunity to create high quality images, the photographer has more control over the appearance of the image. Raw conversation software allows the photographer to edit the parameters of the white balance, lightness, hue and saturation etc. Again, another reason for us to use raw format, as we are aiming for high quality images that we can manipulate and edit well.
The detail an image can contain is also a benefit of using raw image format. The saturation, highlights and shadows may be made more potent as the data from the photograph is not yet rendered and clipped to the colour space gamut, and the limitations of colour representation are avoided. The colour space can be set to whatever the photographer desires. Raw files have twelve to fourteen bits of intensity information and are not gamma compressed like the way JPEGs are stored in the camera, and realising this, we can use this to our advantage when wishing to create photographs of high quality that we can edit and manipulate as we see fit. JPEG files are processed within the camera and how they are processed varies from model to model – we do not wish to risk compromising our artistic principles by limiting our control of the image this way. The properties of a raw image are also more detailed than they are in other image formats. A raw image can tell you more about itself, more information is included.
During the editing process, the raw image format is non-destructive to the data, meaning that instead of replacing the original edit when manipulating the images, a duplicate copy is made rather than changing the original data. This will be helpful during the editing process as it means that if a mistake is made, or an image is unsuitable once edited, we will be able to return to the original image to start again.
However, with the aforementioned advantages clear in using raw format in photography, there are disadvantages. Firstly, because raw is not a typically used format with regular camera users, more specialist software may be needed to even open the image in raw format! We can overcome this easily however, as we have a variety of software (such as Adobe Photoshop CS5.1) which allows the navigation and editing raw images possible.
Raw images also take a long time to load in comparison to other formats. It takes longer to record to the card, especially with compressed versions and takes up considerably more space on the card than a JPEG, for example. Camera raw file size are typically 2–6 times larger than JPEG file size. Sometimes more memory cards are needed when aiming to take a certain amount of photographs. Raw images also take longer to load onto a computer, longer to burn to CDs and it takes more CDs told contain all of them. Not only is this a drawback because of the bigger file sizes, but the formats are also not standardized. This can be easily overcome however as we have access to the latest version of photoshop. The fact that memory cards are relatively inexpensive we will also take into consideration when realising the amount of cards needed to record a certain amount of photos in raw format.
However, because the files are not standardized, it is not possible to send these raw photos via email and expect every recipient to be able to open them. Also, if they have the means to open the image, we will have lost control over how the file looks as they may opt to open it differently. When shooting in raw, this is easily amendable however, as it is possible to convert the finished photograph into another format such as a JPEG or TIFF and since we will be using Photoshop anyway, this presents no significant problem.
In conclusion, we have taken into account the advantages and disadvantages of using raw image format when shooting, and have decided that we are all technically gifted enough and competent enough with camera use to overcome the drawbacks associated with raw images. Although shooting in raw may be time consuming, incompatible with some software packages and too large a file to send via email, inconvenient as this is, we have all agreed that the quality and useful properties of raw shooting is not only worth using it, but we are all competent enough to overcome the difficulties when taking photographs in this setting.
- Louise Hart